How and When to Replace Your Inground Pool Liner
Poor inground pool liners. They’re so neglected. Like most of us, you probably spend the majority of your pool maintenance time balancing the water and adding chemicals, and making sure your equipment is running smoothly. And there your liner sits, holding thousands of gallons of water, being ignored every day. It’s a thankless job.
Eventually, your liner will go on strike. Maybe not altogether or in a big way. Maybe it’ll just develop a teeny, tiny tear that you can’t even see unless you’re right up close. And because you can’t see it, you might not notice it until it’s too late, and patching isn’t enough. You’ll need to replace your pool liner.
Inground Pool Liners: Strong but Not Invincible
Anything that can hold tens of thousands of gallons of chemically treated water day in and day out has to be super strong, right? Absolutely. Inground pool liners are built to be sturdy and long-lasting.
But everything eventually wears out over time, even the heavy-duty vinyl used in your liner. And sometimes, certain conditions or events occur that can speed the aging process, or just outright cause damage that can only be addressed with the purchase of a new liner.
Sunlight
They’re great for warming up your pool, but they’re not so great for your liner. The sun’s ultraviolet (UV) rays can take a toll on your pool liner, not just bleaching it, but eventually making the portion that remains above the water level brittle and weak.
Overchlorination
We get it. You want a clean pool. Who doesn’t? But when it comes to chlorine, more isn’t always better. Just as too much bleach in your laundry can eventually start to wear holes in your clothes, too much chlorine in your pool can slowly eat away at the liner, weakening it.
Lawn Mower Shrapnel
You try to clear your lawn of all obstacles before you mow. But sometimes, something slips through, and your mower sends it flying. If it lands in your pool, possibly hitting the liner before sinking to the bottom, it can cause tears.
Stormy Weather
From heavy thunderstorms to hurricanes, weather beats up on your pool like nothing else. Tree limbs or other debris might fall into your pool, scraping the liner on its way down, or damaging the bottom when it lands.
Playful Puppies
Taking a swim can help your dog cool off in the summer. And some dogs just really enjoy the water. But if their nails aren’t trimmed (or they are, but have ragged edges), or your buddy decides to try to claw his way out via the wall instead of taking the stairs, he can inadvertently scratch up the liner.
Expansion and Contraction
Everything reacts to heat and cold by expanding and contracting. Even things that seem completely solid, like concrete. The same is true for vinyl. Over the years, all that expanding and contracting can create weak spots.
Old Age
Getting old sucks. The older we get, the less flexible and sturdy we are. The same is true for inground pool liners. They become brittle over time, or stretched thin from holding all that water over the years.
The average pool liner lifespan is 5 to 9 years. If it’s low quality or it becomes damaged, it may not even last that long. And if it’s been in your pool for 15 or 20 years, even if everything looks fine, you may want to consider replacing it before the inevitable happens, and you end up having to address a leak.
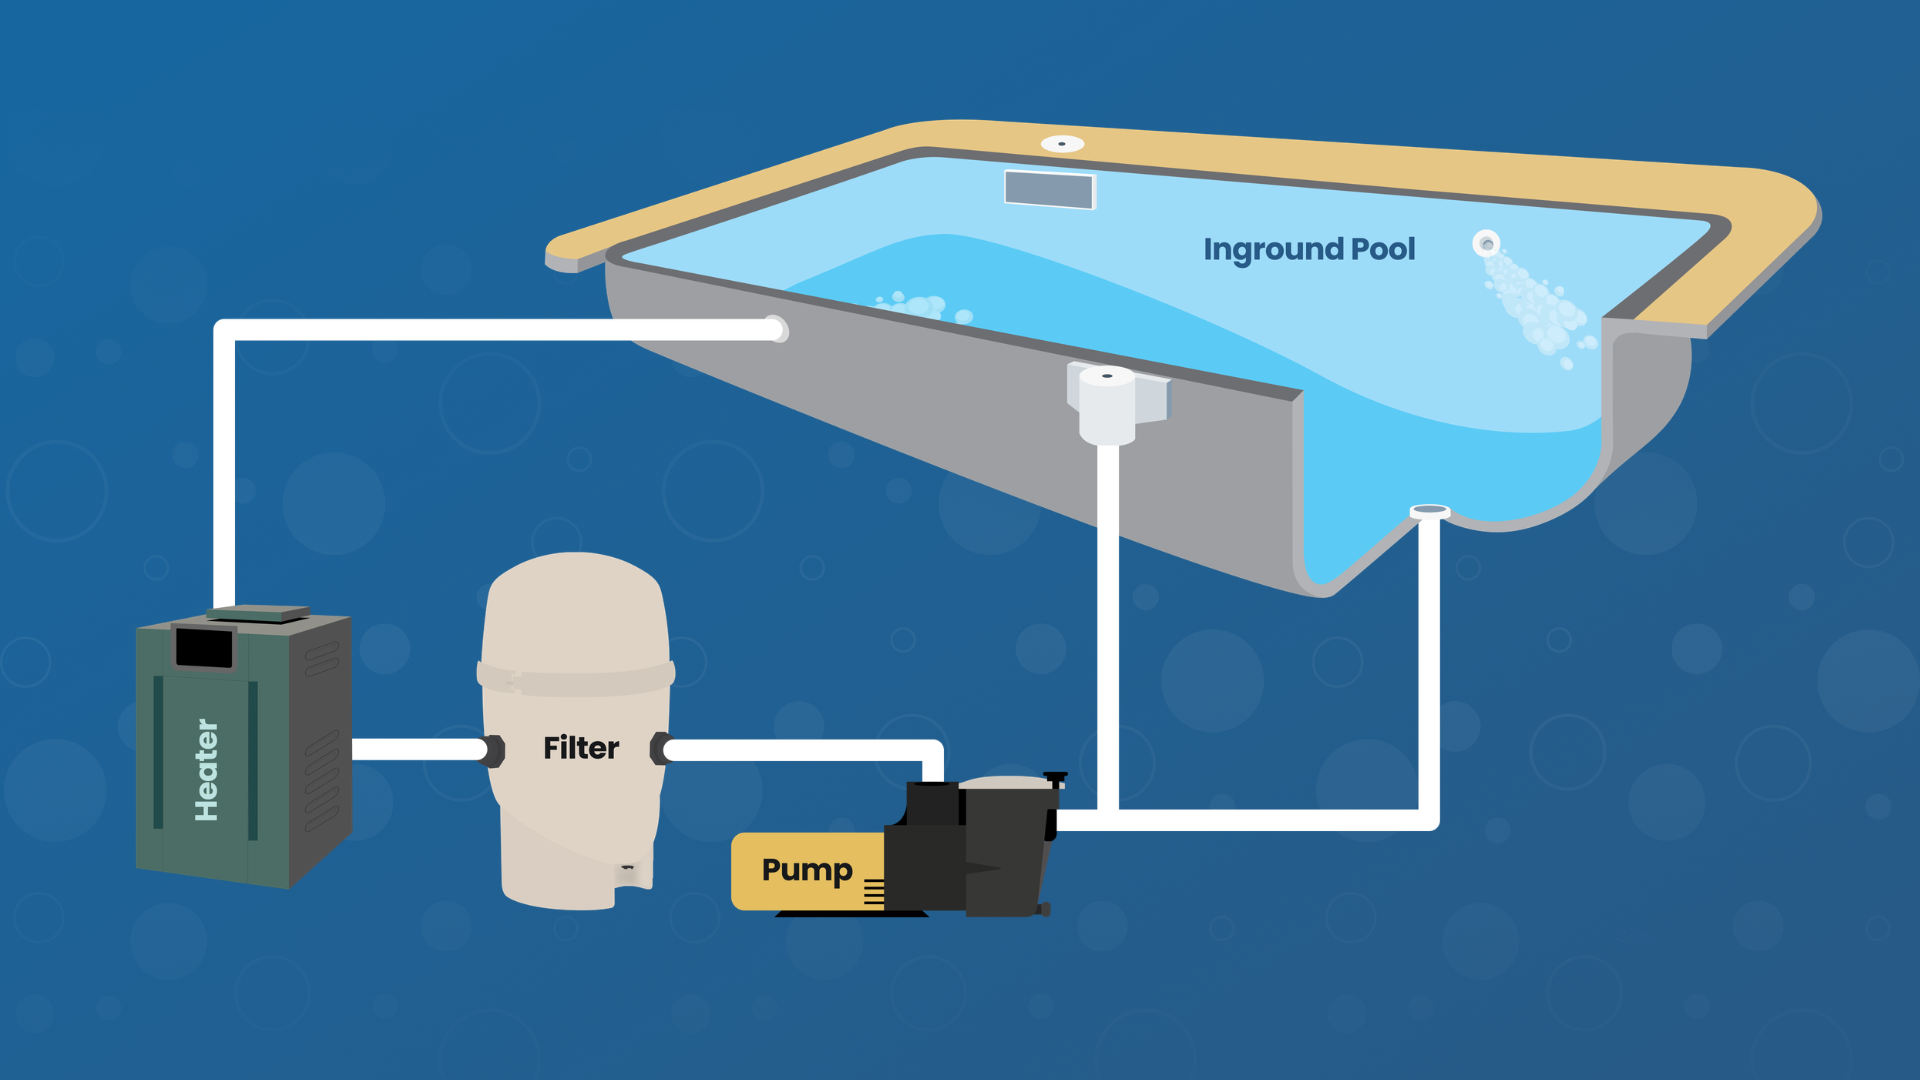
Leaky Liners Create Profound Problems
Normal evaporation can lower a pool’s water level by ¼ to ½ an inch per week. A few external factors can increase that rate, such as: warm pool water; warm, dry air; windy conditions; and heat generated by sunlight.
But if you’ve noticed your water level dropping by an inch or more per week, it may be an indication of a leak. If you know how to patch a pool liner, you may be able to find and fix a pool leak, and a patch may last for a while. Eventually, though, you’ll need to replace that liner to prevent damage to the underlying structure of your pool, your deck, and your yard.
How to Choose a New Inground Pool Liner
If your pool came with the house when you bought it, you may not know where to even begin to decide on a new one. Knowing a few key terms will help you make an educated decision.
Virgin Vinyl
We’re not talking about Richard Branson’s record company. When referring to pool liners (or other products made of vinyl), virgin vinyl means the material doesn’t include any other plastics or recycled vinyl sources. It’s brand new, fresh from the factory, and that’s a good feature to have.
Virgin vinyl expands and contracts more evenly than composite vinyl, which means less chance of premature weak spots caused by temperature fluctuations or UV exposure.
Mil
Thickness is an indicator of durability in pool liners. For inground vinyl liners, thickness is measured in mil. Not to be confused with millimeters, this is a standard unit of measure that equates to one one-thousandth of an inch.
Most vinyl liners range between 20 and 35 mil. So a 20-mil liner is 20 thousandths of an inch thick. For a little context, a sheet of regular paper measures 10 mil. A dime is 49 mil.
You may also see some inground liners have two mil figures, such as 28/20. The first number refers to the wall section, and the second number is the floor. The wall will always be the larger number, thicker because it expands and contracts much more than the floor does. The two pieces are sealed together at a seam where the wall and floor meet.
Keep in mind, thicker doesn’t always mean better. For quality, better to aim for virgin vinyl. You don’t need to pay thousands of dollars more for super-thick vinyl to get 15 years out of your liner.
Gauge
Less common among inground liners is the gauge measurement. It’s not standardized in the pool industry, though some manufacturers use it interchangeably with the mil. But because it doesn’t represent a true unit of measure, liner makers can embellish a bit with gauge figures. The difference is usually negligible, but mil is the more trustworthy figure to go by.
Warranty
OK, you already know what this one means. But it’s important to check the warranty’s fine print before buying an inground pool liner. Nearly all liners carry a warranty, but their terms and coverage amounts vary significantly. A 20-year warranty covering few issues may not be worth the extra money you’d spend to get it.
How to Measure for a New Inground Pool Liner
Once you’ve determined it’s time for a new liner, your first step will be to measure your pool. It’s important to measure as accurately as possible because most replacement liners are cut to fit based on the figures you provide.
Some manufacturers have templates or apps for recording and sending measurements to them. Measuring a rectangular pool is pretty straightforward, but other pool shapes can be tricky.
If you have anything other than a rectangular pool, you may want to hire a professional to ensure accurate measurements. The last thing you want to do is spend a lot of money on a new inground pool liner only to find it doesn’t fit. If you decide to go with a pro, you can skip all the measuring stuff.
If you decide to do it yourself, you’ll need:
- Two, 100-foot tape measures
- Pencil and paper (or liner manufacturer’s template)
- Telescoping pole
- Utility knife
- Chalk
- A couple of friends to help
1. Measure Length and Width
In a round pool, measure straight across in two different spots to ensure accuracy. In oval pools, measure round end to round end for length, then two parallel spots on the sides for width. Measure the short and long sides of a rectangular pool in two spots each to check your results.
- Rectangular Pool: Measure the short and long sides in two spots each to check your results.
- Round Pool: Measure straight across in two different spots to ensure accuracy.
- Oval Pool: Measure round end to round end for length, then two parallel spots on the sides for width.
Important: Measure inside the pool walls (the liner won’t cover the pool coping), and pull the measuring tape as tight as possible. Getting into the water may make this easier.
2. Measure the Corner Radius
Find the seam in each pool wall (called panel joints) nearest the corner. Starting at each joint, pull a tape measure out parallel to the wall. The distance at which they cross is the corner radius.
Tip: Obviously, round and oval pools won’t have corners. This is where hiring a pro to take these measurements becomes a really good idea.
3. Measure Three Depths
Measure each end, then find the difference between them to get three depth figures.
- Shallow End: Measure the depth from the top of the liner track to the bottom of the wall on each side of the shallow end. You may use the utility knife to cut a slice in the liner and insert your measuring tape behind it to make measuring easier. But only do this if you’re definitely replacing the liner!
- Deep End: Insert the telescoping pole straight down to the flat part of your deep end (called the hopper). Mark it with chalk, then lay the pole on the ground and measure to your chalk line.
- Figure the Difference: Subtract the shallow depth from the deep end depth for your third depth figure.
4. Measure Four Lengths
Extend one measuring tape along the full length of your pool—again, inside the pool walls, not up on the pool deck—to get the three length figures you need. This is where a couple of friends will be really helpful.
- Shallow End: Use the telescoping pole to feel where the slope to the deep end begins. Check the tape at this spot to get the length of the shallow end.
- Slope: Feel with the pole to where the slope ends, then check the tape for the distance from the top to the bottom of the slope.
- Hopper: Use the pole to find where the back pool wall begins to slope upward. The distance from the middle slope to the back slope is the length of the hopper.
- Determine the Back Slope Measurement: From the deep end to the back side of your pool, the wall slopes up and out. Get the length of this slope by subtracting the three length measurements (shallow end, slope, and hopper) from the total length of your pool.
5. Measure the Sidewall Slope and Hopper Width
This one’s a little tricky.
- Sidewall Slope: Extend one measuring tape across the back end of the pool. Run the telescoping pole down the sidewall of your pool until it hits the bottom. That’s where the slope ends. Lay the pole down onto the coping on the side of the pool. Extend your second measuring tape from the spot where the pole hits the pool edge to the first measuring tape to find the sidewall slope.
- Determine the Hopper Width: Subtract both sidewall slopes from the full pool width to determine the hopper’s width.
Important: We can’t stress this enough. Measuring instructions online, whether written or in a video, only go so far. If you’ve never measured for a pool liner before, and you have any doubts about doing it yourself, we highly recommend hiring a professional to measure for you. If you measure incorrectly, and get the wrong size liner, you’ll be out a lot of money for something you can’t use, and that can’t be altered.
Inground Pool Liners: The Replacing
Even if your measurements were good and you got the right size liner, if you install it poorly, you could end up with a big, watery mess on your hands. So we’re going to start with another recommendation: If you’ve never replaced an inground pool liner before, and you have any doubts about how to do it correctly, hire a professional. If you decide to go that route, you can skip down to what you’ll need to do once the liner is installed.
1. Empty Your Pool
Improperly emptying an inground pool can cause the pool to literally pop out of the ground. Make sure you know how to drain a pool before you begin.
Also, make sure you direct water to sanitary sewage so it won’t kill wildlife or create perching. If you’re not sure about this, contact your local water authority to ensure you’re following municipal rules. This doesn’t just protect wildlife; it can protect you from fines.
Gather your tools while you wait for the water to drain. You’ll need:
- Pool liner
- Screwdriver
- Push broom
- Pool wall foam
- Pool wall foam spray adhesive
- Gaskets for fittings (optional)
- Shop-Vac
- Duct tape
- Utility knife
- Garden hose
2. Remove Everything
Use a screwdriver to remove all the faceplates and gaskets. Pull the old liner from the bead track or trim it away. The liner will be heavy, so cut it into smaller, more manageable sections to remove it more easily. Pull the remaining strip from the track.
3. Make any Necessary Repairs
If your pool walls have cracks, fix them now. If you uncover significant damage, it may require professional repairs before you can install the new liner.
4. Install the Foam
Use the utility knife to cut the foam into strips for easier installation. Use spray adhesive to secure the strips to the pool walls. Work in sections, carefully lining up the foam to prevent gaps. Be aware that using wall foam may actually increase the risk of liner punctures.
5. Place the Liner
Take the new liner to the center of the pool and unfold it. Remove your shoes, then standing inside the liner, use your feet to help spread it out. Once the liner floor is lined up nicely, head to the shallow end and begin tucking the liner into the bead track.
If you chose a liner with a pattern, adjust to keep it even and consistent as you work your way around the pool.
6. Remove the Air
Directly across from the skimmer, pull a few inches of liner back out from the track. Insert the Shop-Vac hose, then carefully slide it down about three feet. Make sure the hose is at least six inches above the pool floor.
Use duct tape to secure it, sealing the entry point completely. Turn the vacuum on, then shuffle around the pool floor or use the push broom to help smooth the liner. Do not turn the vacuum off yet.
7. Install the Main Drain
When the vinyl looks smooth, install the main drain cover with a new gasket in the deep end.
8. Start Filling the Pool
You can choose from a few pool water delivery methods, but let’s go with the easiest. Run a garden hose into the deep end and turn on the spigot. When the shallow end contains six inches of water, turn off the Shop-Vac. Remove the duct tape, pull the hose out, and push the liner back into the bead track.
8. Install Gaskets and Faceplates
When the water in the shallow end is at least 12 inches deep, you can start replacing gaskets, faceplates, and step gaskets. The liner will stretch and move while filling, so installing these accessories before this point could result in tears. And tears.
9. Finish Filling
Using a garden hose to fill a pool can take a day or more, depending on your water pressure. Be sure to keep an eye on it, though, to avoid overflow.
10. Test and Balance the Water
You need to get a baseline, which will tell you which chemicals to use and how much. For this, it’s best to use a high-quality testing kit rather than test strips in order to get more accurate results.
Once you know what’s going on in the water, you can follow the same steps to open an inground pool, including using all the same chemicals.
Important: Do not skip the pool shock. Water that comes directly from your spigot, even though it’s been through a water treatment plant, can still contain microorganisms like algae spores and bacteria. Be sure to wait until dusk or nighttime to shock your pool.
We’re OK, You’re OK, and Your Pool’s OK
So how are you feeling? A little overwhelmed? Or are you raring for the challenge of replacing your inground pool liner? Sometimes the best way to learn how to do something is just to jump in and do it. But don’t say we didn’t caution you about those measurements. They have to be absolutely accurate.
Once you’ve got that new liner in, though, you’ll be all set to go back to ignoring your liner and enjoying your pool. Or maybe now that you see just how important your liner is, and what goes into replacing it, you’ll have a whole new appreciation for it, and will give it a little pampering now and then.